Whether you’ve made several full bust adjustments in the past, or this will be your first time, this guide will walk you through making a full bust adjustment (FBA) for your Cedar Sweater. This method will also work on any dart-less pattern. Step-by-step photo tutorials are below for both the Crew View and the Raglan View of the Cedar Sweater.
-
 Cedar Sweater PDF Pattern$13.00
What is an FBA?
A full bust adjustment (or FBA) is a way to manipulate your paper pattern piece in order to create more volume at the bust in your finished garment. There are several methods for doing a FBA out there, but this one works well with the Cedar Sweater Pattern. This method is for doing a FBA without a dart in the pattern, and the Cedar Sweater is indeed dart-less. This method also addresses the common issue that a full bust may raise the front hem of the sweater. Since the Cedar is already cropped, you don’t want the hem to raise up any higher. There is another great FBA method that is commonly referred to as a “pivot-and-slide,” but that method does not add any length to the front of the sweater, so I won’t be addressing that method here.
How Do I Know if I Need an FBA?
So how do you know if you need an FBA? The answer lies in the finished garment measurements and size chart. The Cedar Sweater is designed to fit based on your full bust measurement. It’s also drafted from body measurements that are B-cup for sizes 0-14, and D-cup for sizes 16-30. The design is a fairly simple boxy top with good ease, so for most people, using the size that matches your full bust measurement will result in a nicely fitting and comfy sweater. If you have a larger bust for your frame, or you commonly make FBAs in other patterns, this may be just the ticket for you and your Cedar.
One quick way to check is to take a measuring tape and measure from the top of your shoulder near your neck and run the tape down the front of your body, over your bust. Check the Finished Garment Measurements Chart on page 2 of the Cedar Sweater Instructions. If that measurement is falling well above your natural waist due to the volume of your bust lifting the tape a bit, you will benefit from this FBA. On the other hand, if you are quite tall or have a long torso, you may simply benefit from lengthening the front and back body pieces of the pattern evenly, using the shorten/lengthen lines in the pattern. Remember, the Cedar Sweater is designed as a cropped sweater to pair with your favorite high waisted pants, so it will be shorter than most sweaters with a traditional cut. It’s a great idea to wear your high waisted pants/skirt while taking this measurement for a reference point.
Gather Materials
- Cedar Sweater Pattern
- Tracing paper or some scrap paper
- Tape
- Pencil
- Scissors
- Ruler
- Curved ruler (optional, but very handy)
Cedar Sweater Crew View FBA
If you are sewing the Raglan View, these instructions are exactly the same. If you are a visual person, there is a photo gallery showing the same steps with the Raglan Front (9) pattern piece. Skip to the bottom of the article, section titled “Cedar Sweater Raglan View Full Bust Adjustment.”
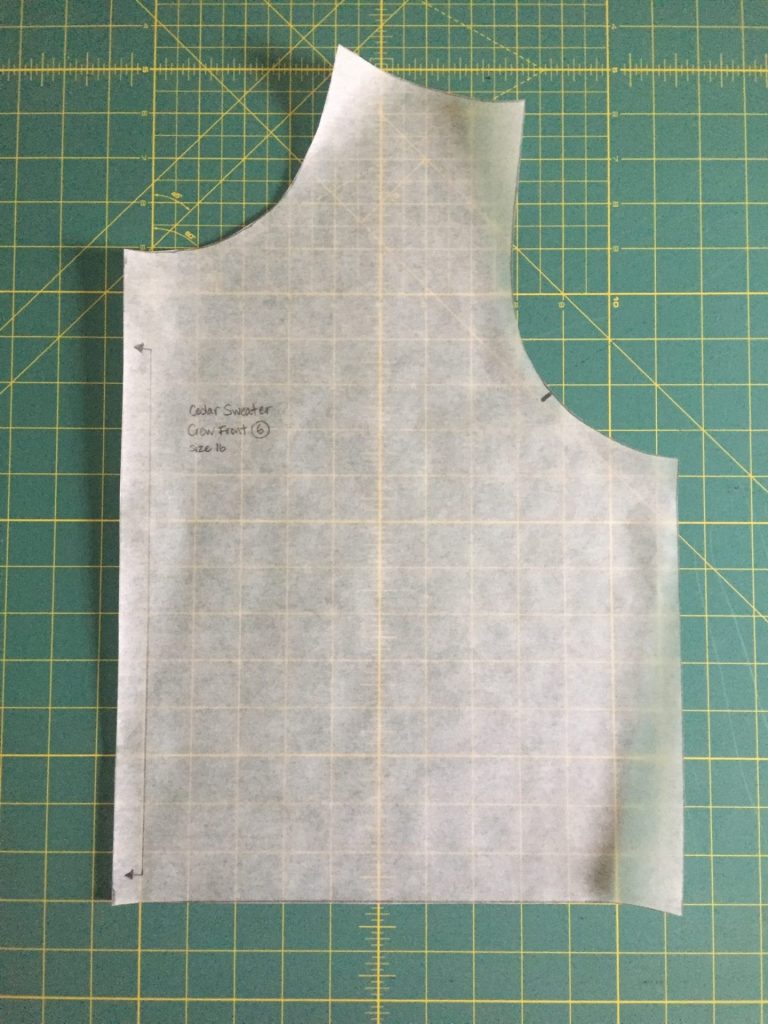
Otherwise, trace or cut out your Cedar Sweater Crew Front (6) pattern piece. You may choose your size based on your full bust measurement, or for a more fitted silhouette, you can size down and add more volume by spreading the pieces further apart (we will get to that in a moment). Remember that this is a comfy sweater with ease built in and there is good stretch (20%) in the recommended fabric, so don’t stress it! It’s not as strict as a skin-tight fitted bodice in non-stretch fabric, ok? No worries! Let’s have some fun.
This tutorial uses a size 16 pattern piece, slashing and spreading 1.” For clarity in the photos, I retrace the pattern pieces after I manipulate them, but you can certainly fill in the gaps with scrap paper and tape. This will save you time and paper. Follow the steps in order for your size. Let’s go!
Find Your Bust Point
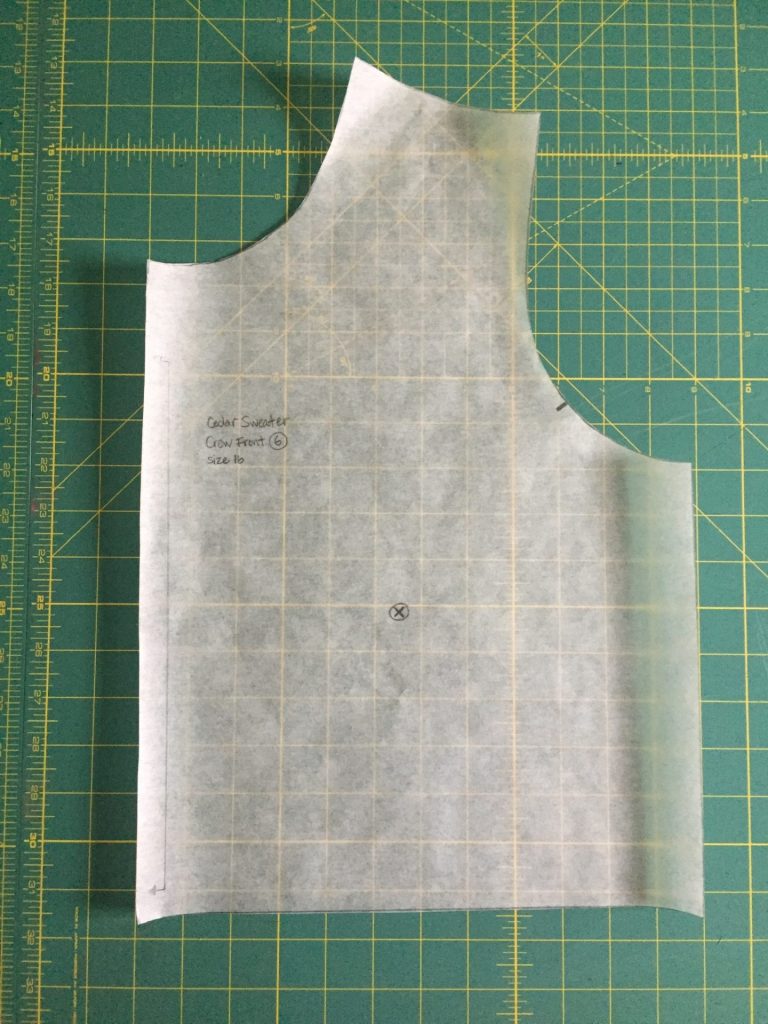
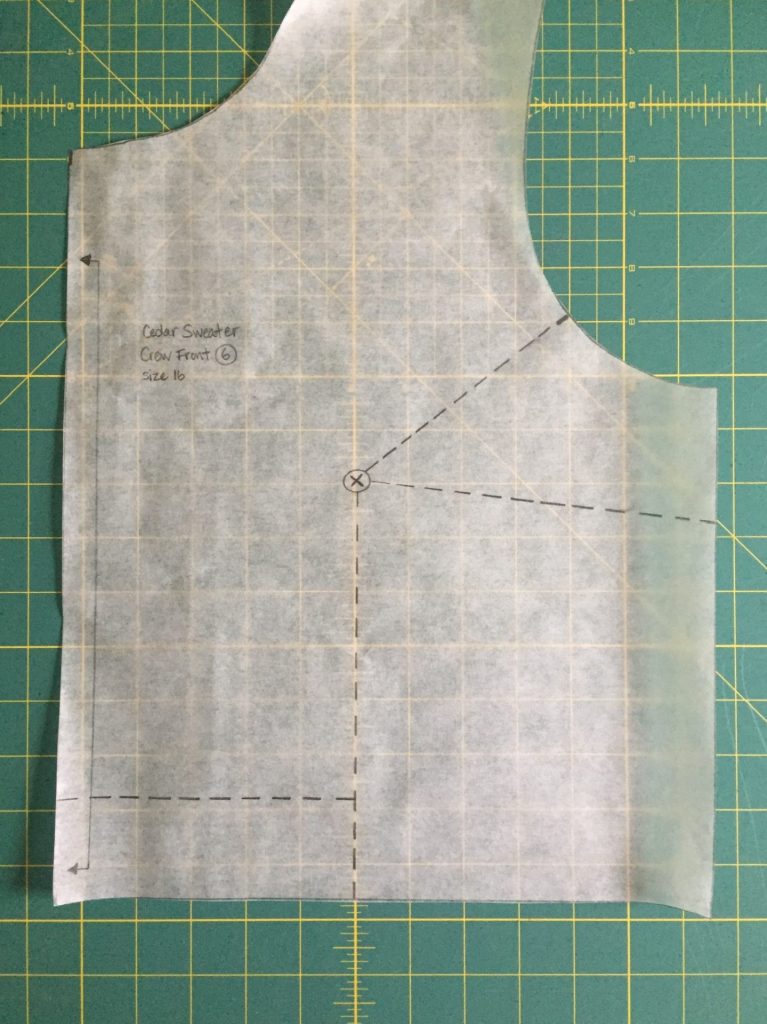
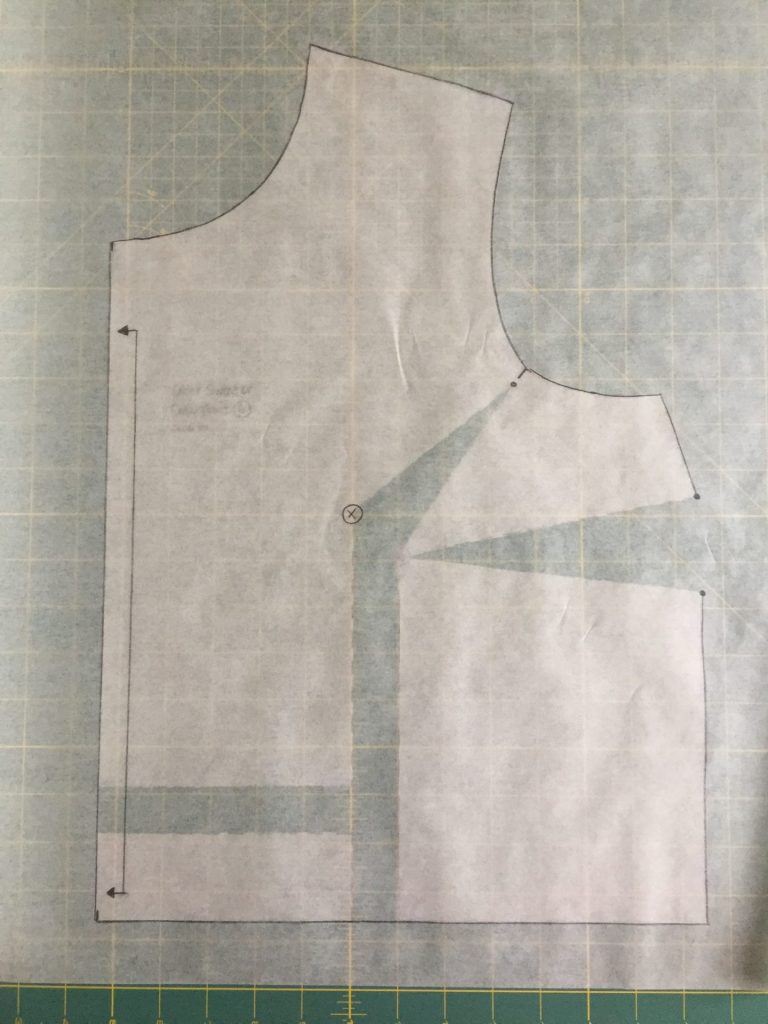
Once you have your Cedar Sweater Crew Front (6) original pattern piece cut or traced out, hold it up to your body. Place the center front notch at the center of your chest and place the shoulder edge at the top of your shoulder. Take the shoulder seam allowance (3/8″) into account. Mark the bust point (where your nipple is) on the paper.
Create a Bust Dart
Since this is a dart-less pattern, we need to draw in a new dart in order to later slash and spread. Use your ruler to connect the armscye notch with the bust point in a straight line. Connect the bust point with the side seam (a few inches below the armscye is good) with a straight line. Draw a line from the bust point straight down to the hem. This line is parallel to the center front (left edge of the pattern piece that is marked on the fold). Finally , a couple inches from the hem, draw a line from that vertical line you just drew to the center front, parallel to the hem.
Slash (Cut)
Now we need to slash these cut lines in order to easily slide and spread open the pattern. Be careful not to cut all the way through the hinges, as indicated below.

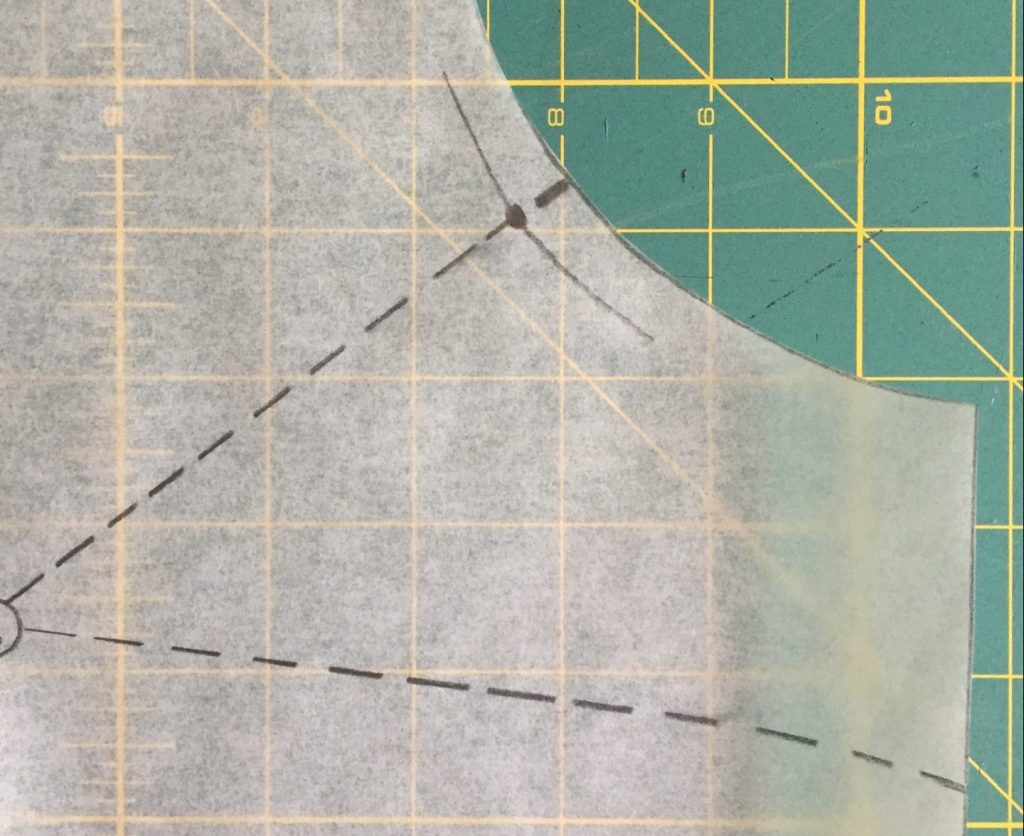
Cut from hem to bust point; continue to seam line dot near notch. 
Snip notch to seam line, not through. 
Cut from side seam to bust point, not through. 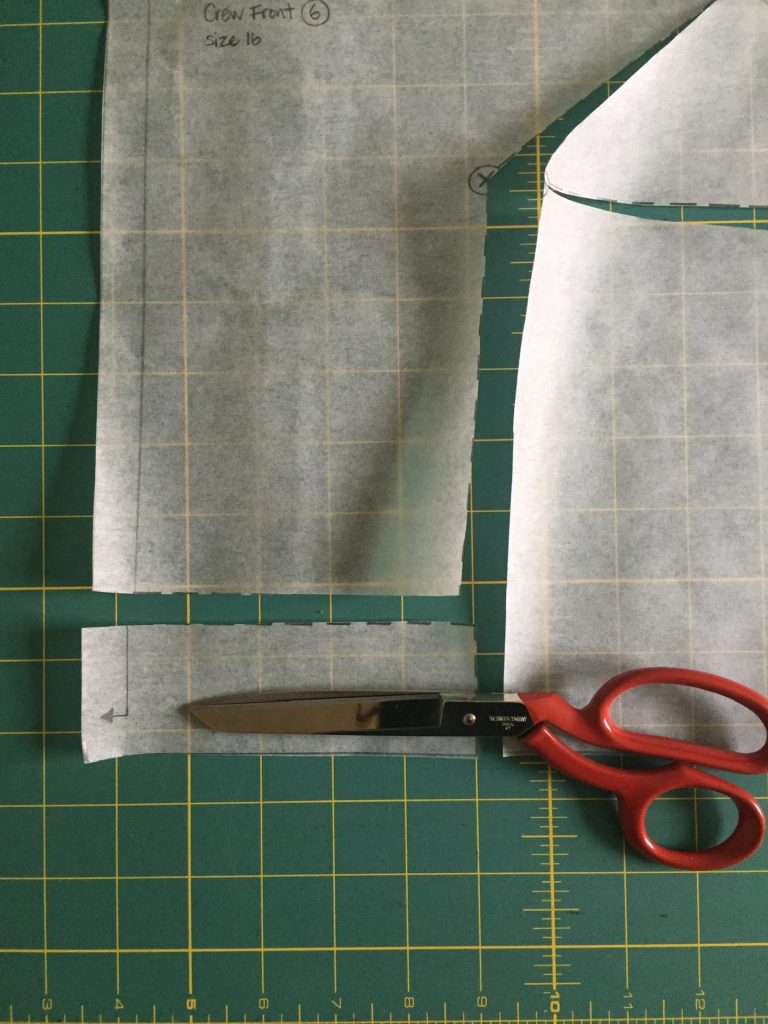
Cut line parallel to hem.
Spread and Tape
It’s really helpful to have a gridded surface like this cutting mat, but any surface will do. Just be sure to keep your vertical edges parallel, and measure how far you are spreading your vertical cut apart. Below, you can see I’ve spread 1″ apart from left to right, aligning with my gridded mat.
Redraw New Bust Dart
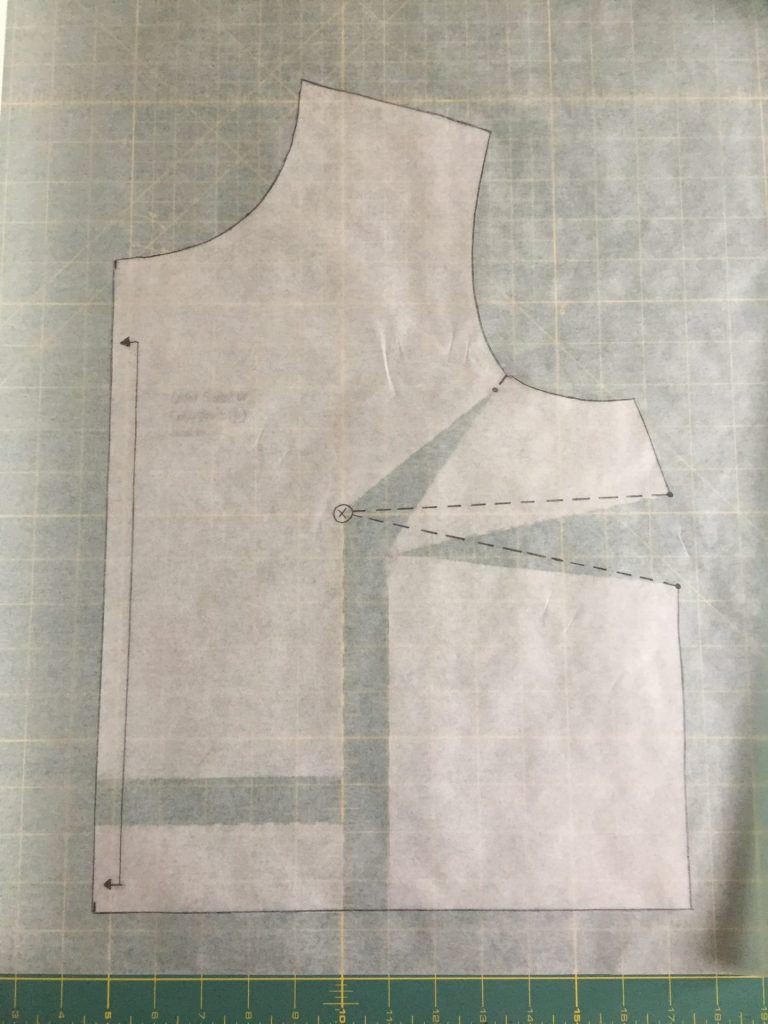
You can now either trace this new pattern piece, or fill in the gaps with paper. If you are tracing, remember to transfer bust point (X) and notch marks to your new piece. Where the pattern was separated at the side seam, place two dots here. We will use those dots in the next step below.
Connect the two dots at the side seam with the bust point (X) in straight lines. This is our new dart. If you are tracing, you can cut away the new pattern, cutting along the new dart lines. If you have filled in with paper, you can cut this dart shape away, since we will close this dart shortly. I think cutting the dart out is much easier than trying to fold it shut.
Pattern piece with new dart. 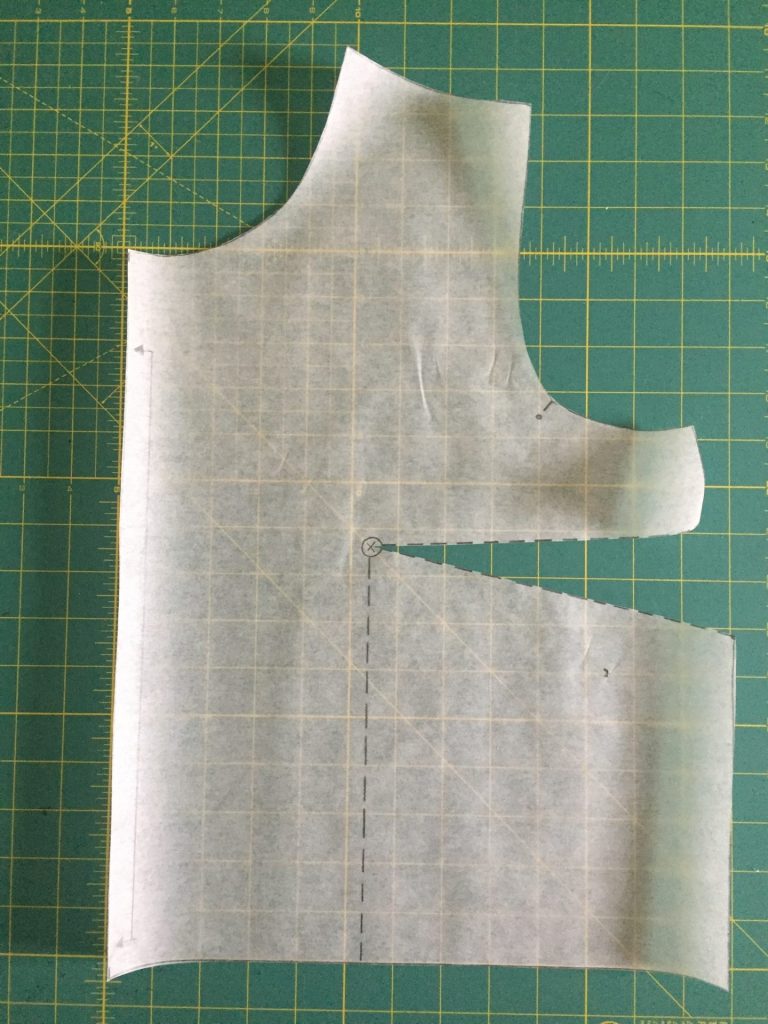
Draw a straight line from bust point (X) to hem, parallel to center front.
Close Dart and Draw New Waist Dart
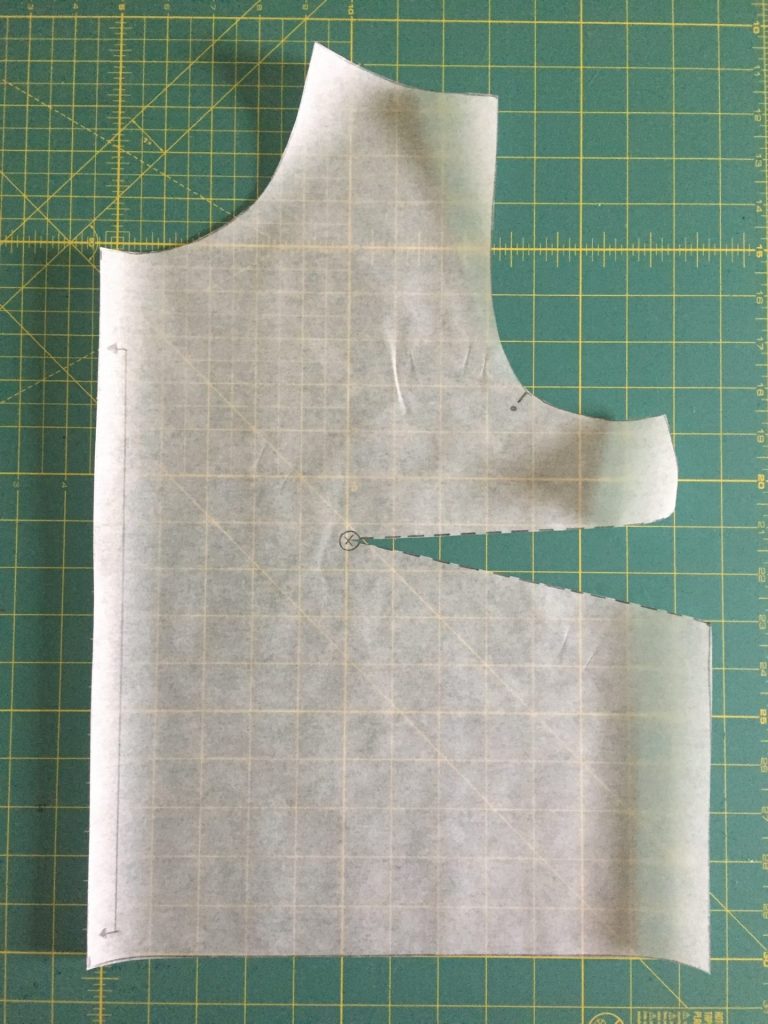
Now we will close the new bust dart that we made and trace a new waist dart with the extra space that it creates at the hem. Cut along the cutting line you made in the last step up to, but not through, the bust point. Pivot this piece up and to the right to close the dart we made in the previous step. Now we have a large open space at the hem.

Cut vertical line and close dart. Tape into place. 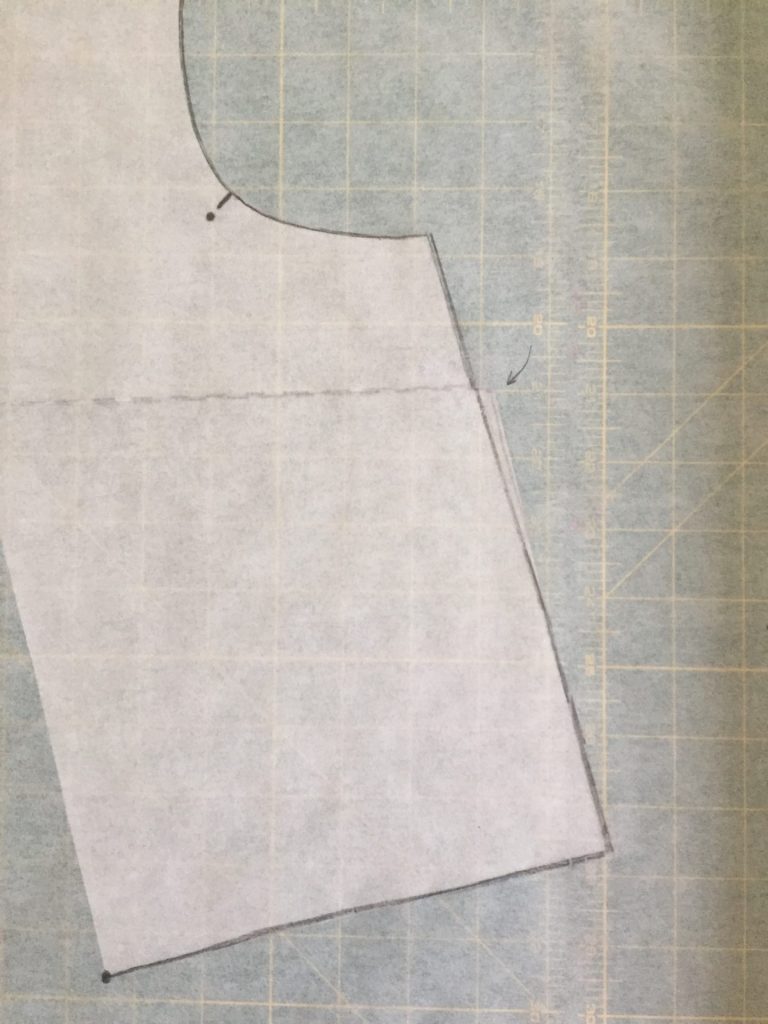
Begin to trace this pattern piece and true the side seam with a straight line, or trim this edge if you are filling in the gap with paper. 
Finish tracing the pattern piece (or fill the gap with paper) and mark the points that were split apart with dots.
Close the Waist Dart and Curve the Hem
Clip from the armscye notch to the seam line dot, not through. 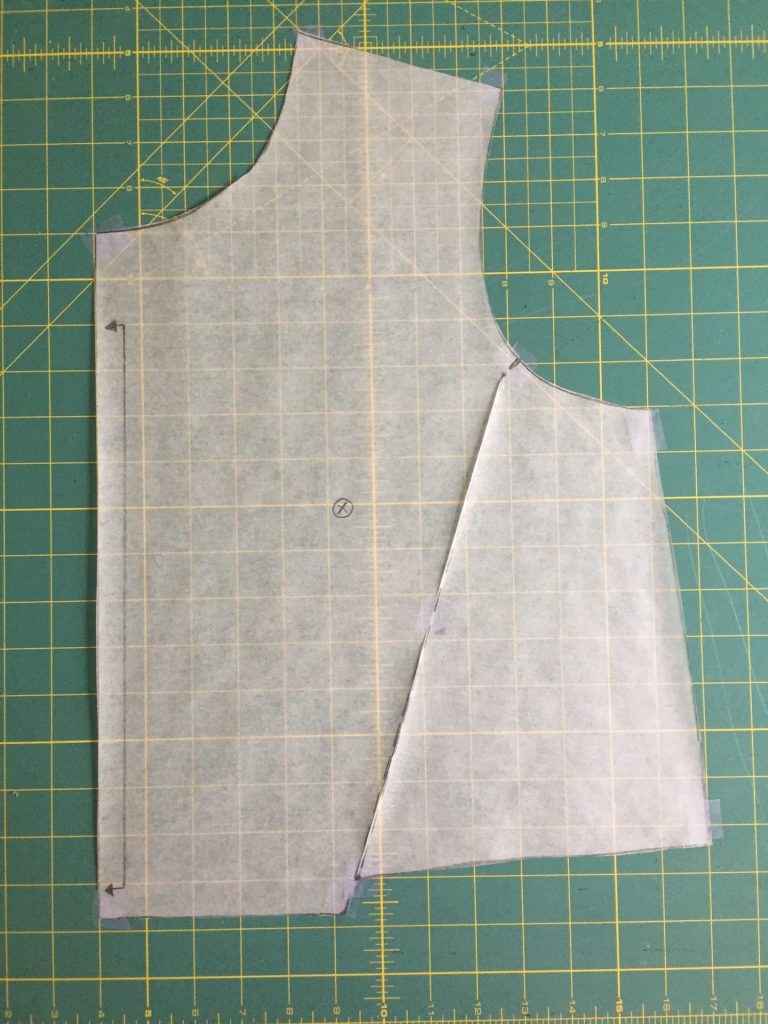
Close the waist dart and tape. 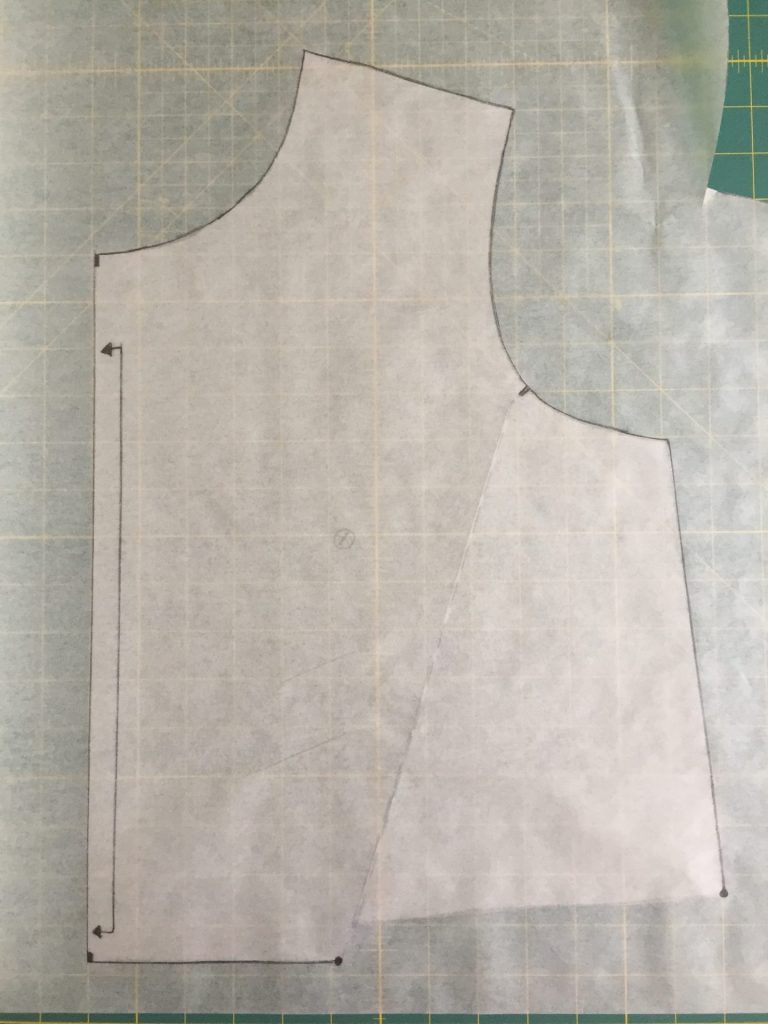
Trace new pattern piece or fill in with paper. Mark the bottom of the side seam and the edge of the lower hem in the front with dots.
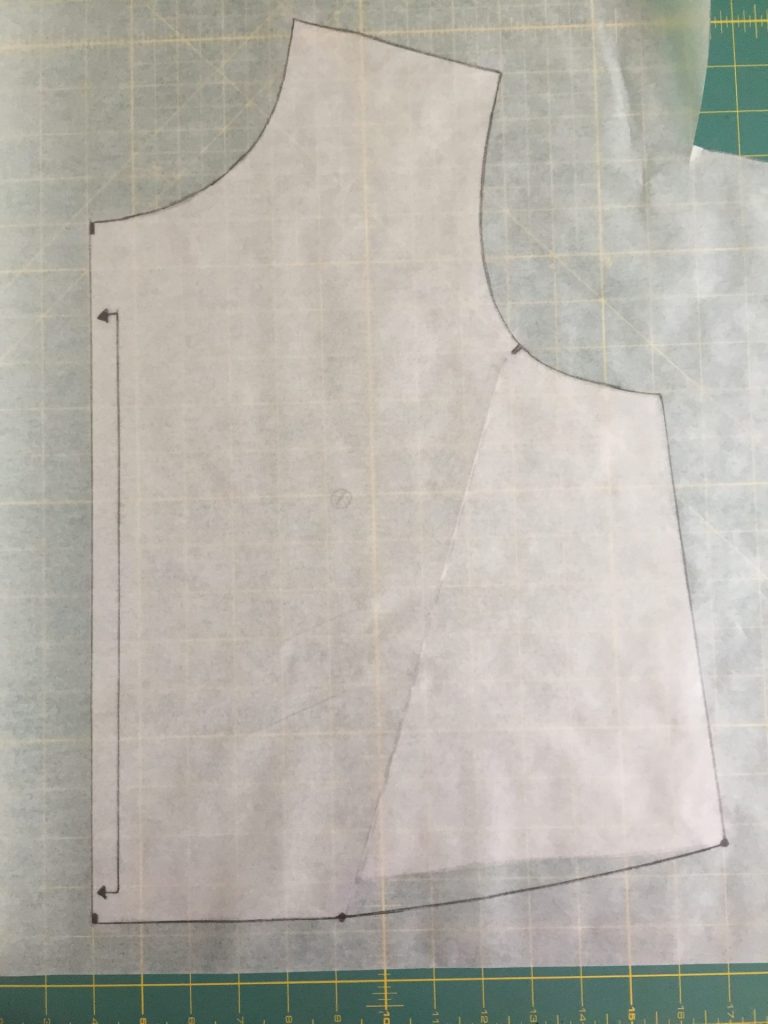
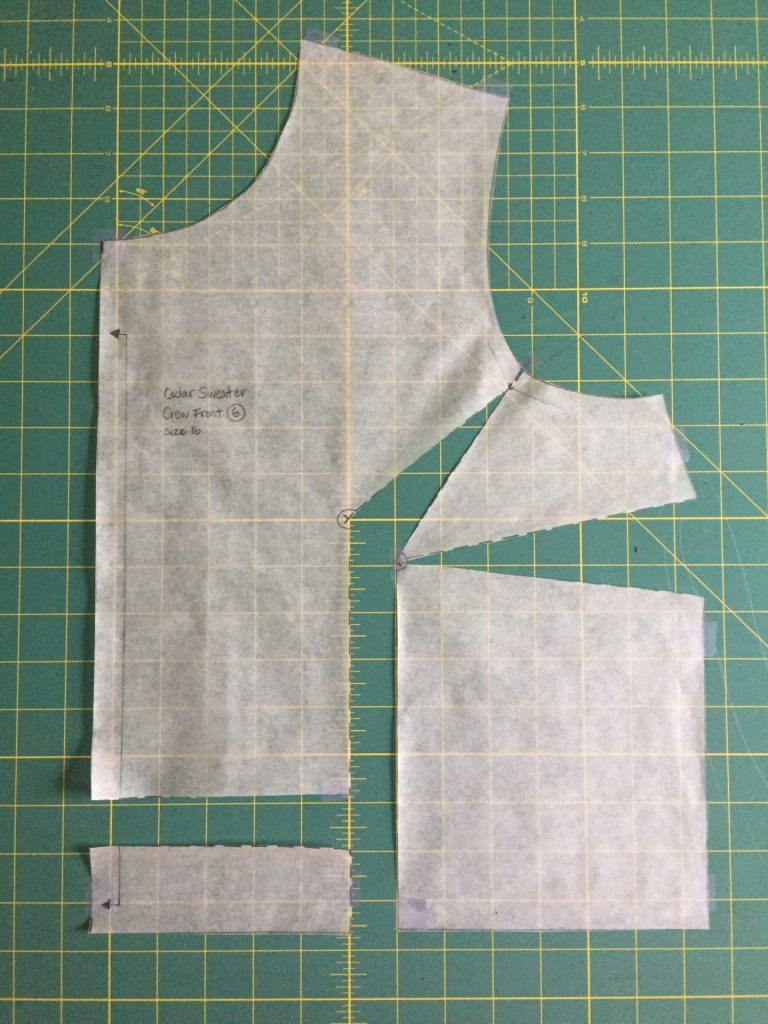
You Finished Your Full Bust Adjustment!
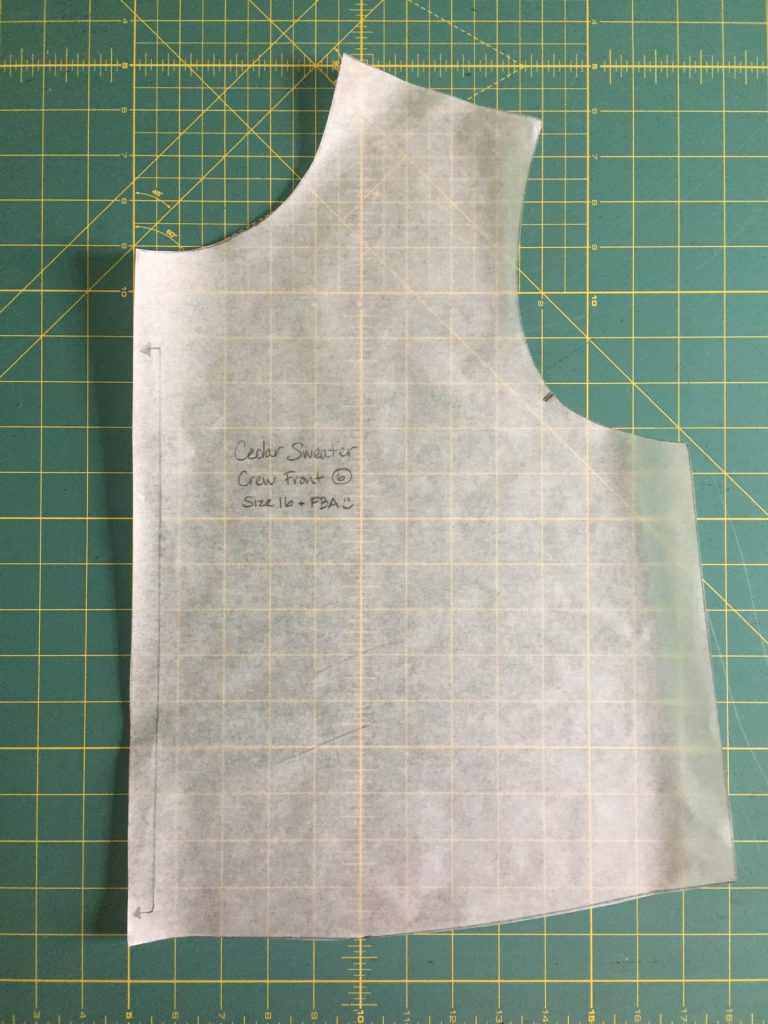
Here’s your new Crew Front pattern piece with your completed full bust adjustment! This pattern piece now gives you more volume in the bust, increasing the length in the front, and keeping the armscye and side seams the same. You don’t need to adjust your other pattern pieces. You are ready to get sewing! If you want to do a full bust adjustment on the Cedar Sweater Raglan View, the steps are the same, but there is a handy photo album walking through all the steps you’ve just done on the Raglan Front (9) pattern piece. Now go sew your Cedar Sweater!

Cedar Sweater Raglan View Full Bust Adjustment
As mentioned above, the steps for doing a full bust adjustment on the Cedar Sweater Raglan Front (9) pattern piece are the same. If you’re a visual person (like me!), here’s a handy photo gallery that walks through the same steps as above using the Raglan Front pattern piece. Abbreviated instructions are in each caption, but if you’re unsure of the details of that step, just pop back to the top of this tutorial to the Crew View FBA detailed instructions if you need.
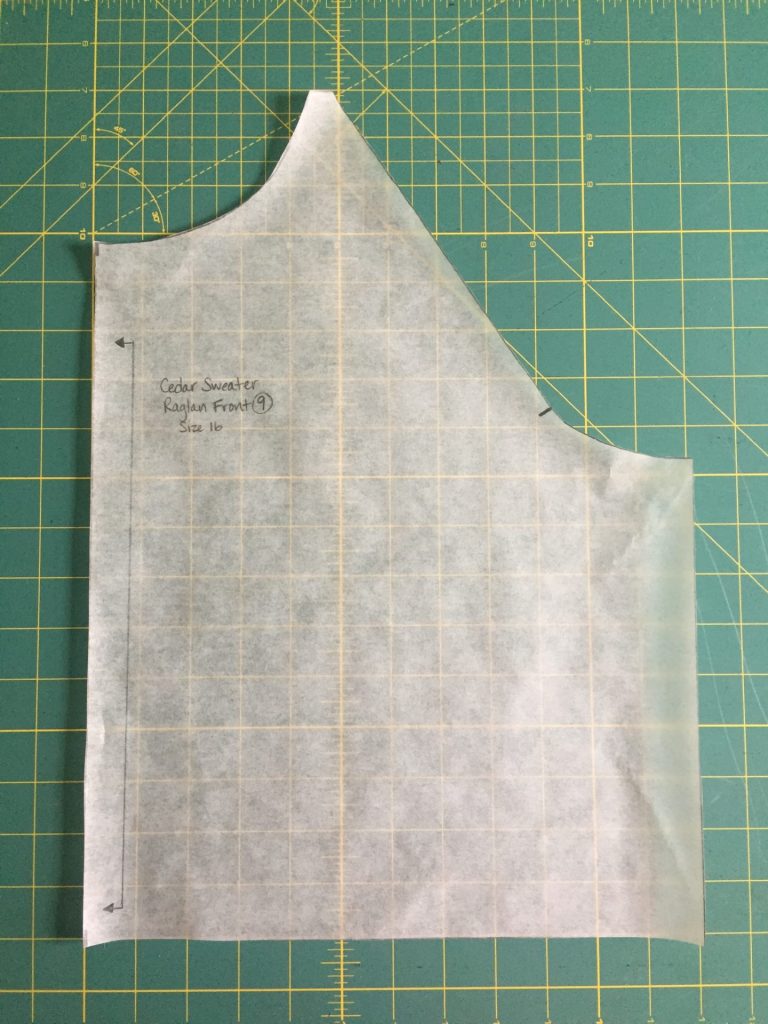
Original Raglan Front (9) pattern piece 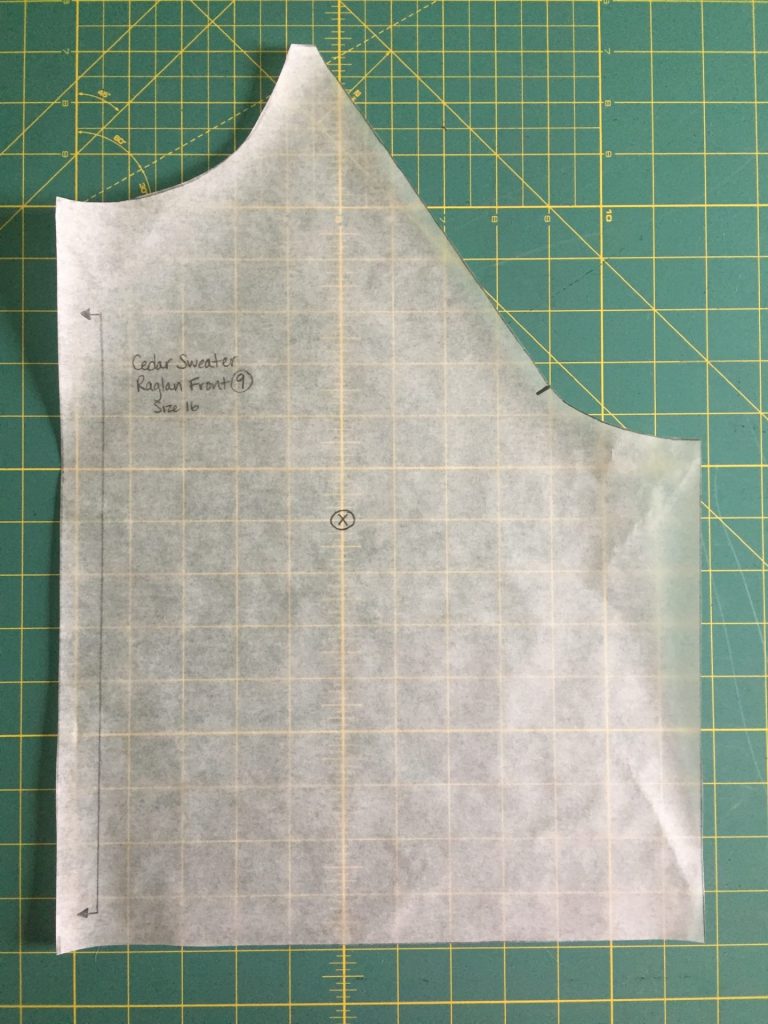
Hold pattern up to body and mark bust point (X). 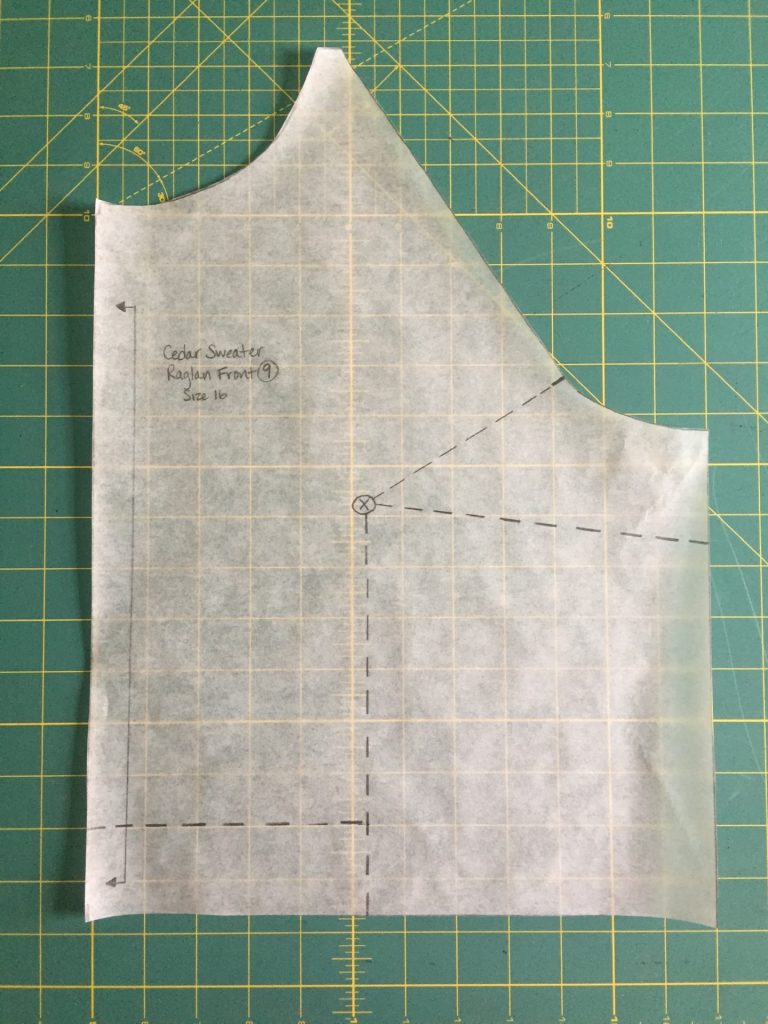
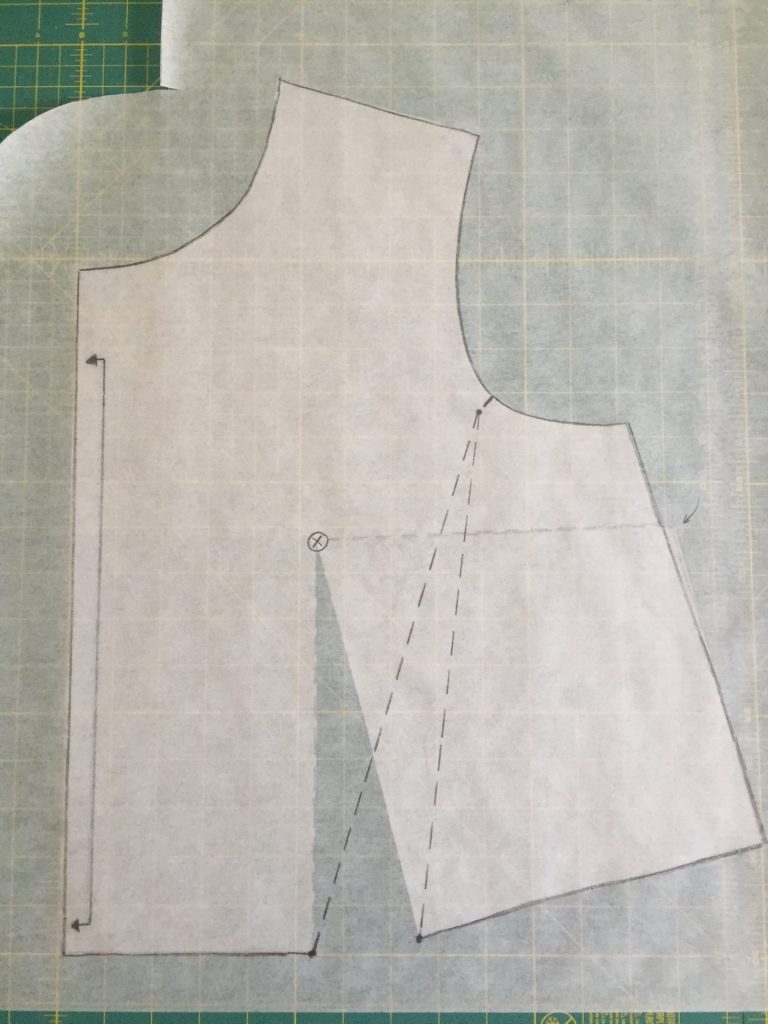
Create dart and draw cutting lines. 
Mark seam line dot near armscye notch. 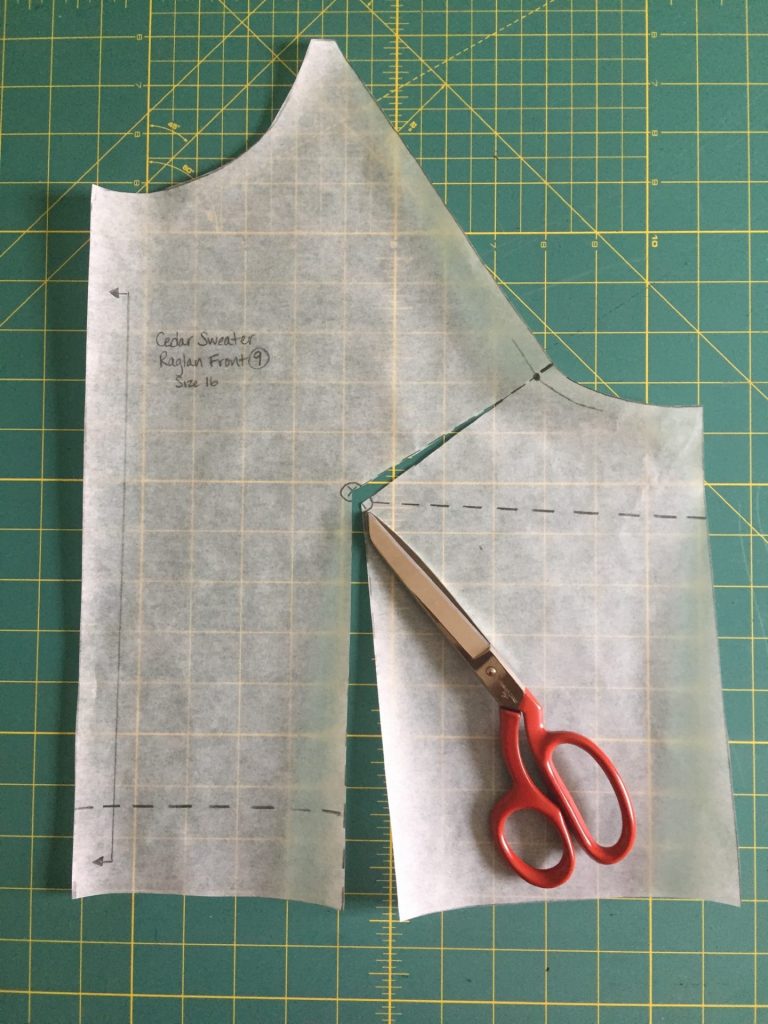
Cut from hem up through bust point (X) and to armscye seam line dot. 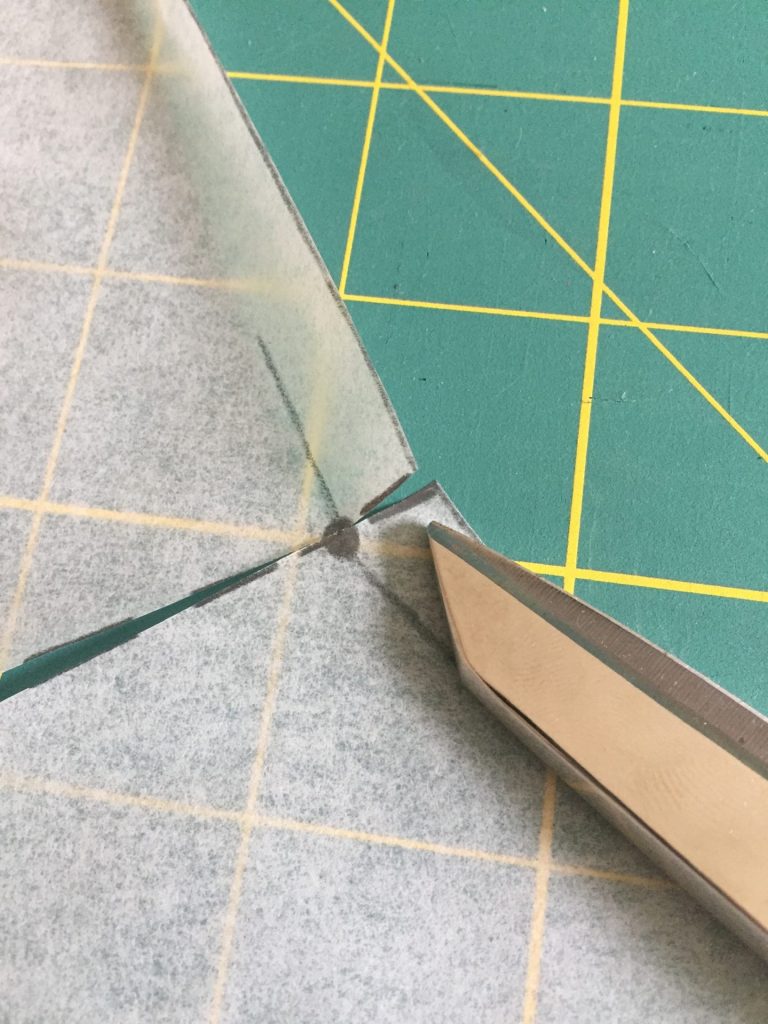
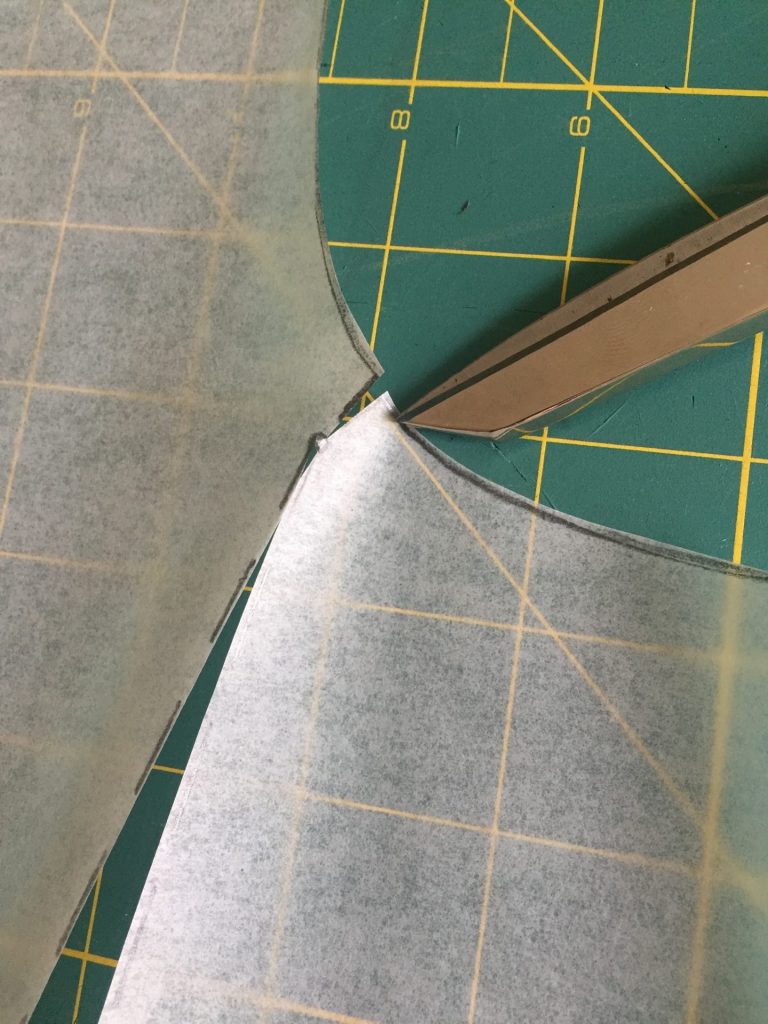
Clip through notch to seam line dot, not through. 
Cut from side seam to bust point (X), not through. 
Cut line parallel to hem. 
Spread pieces (1″ shown). Tape. 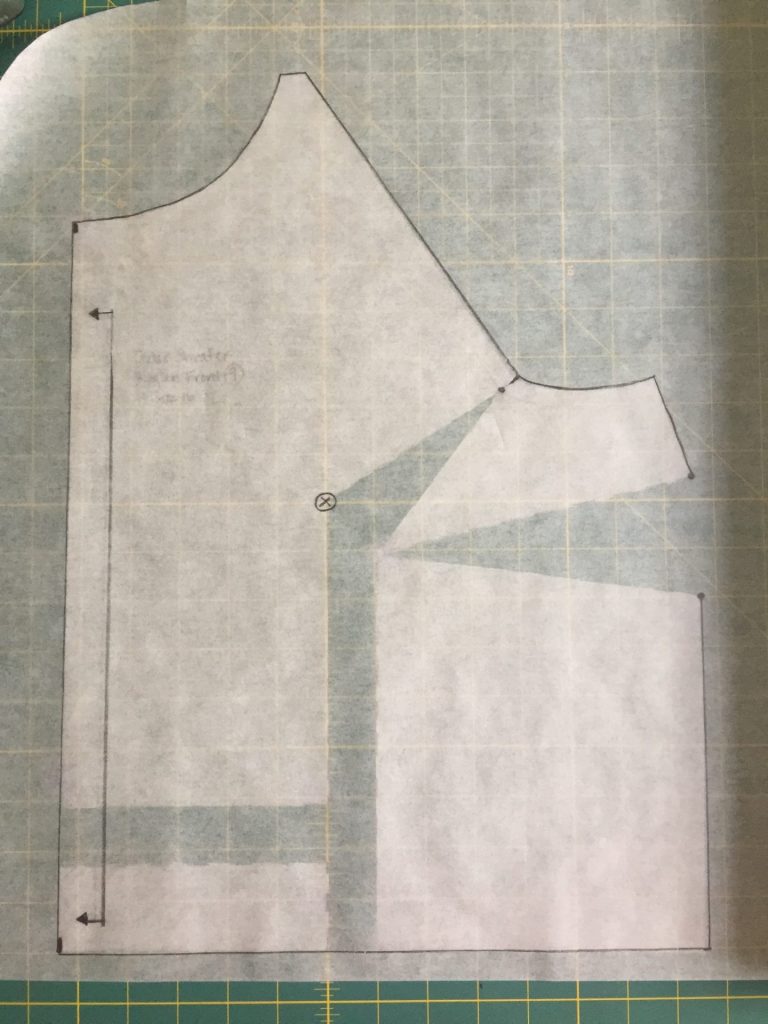
Trace/fill in gaps with paper. Mark where the side seam was split with dots. 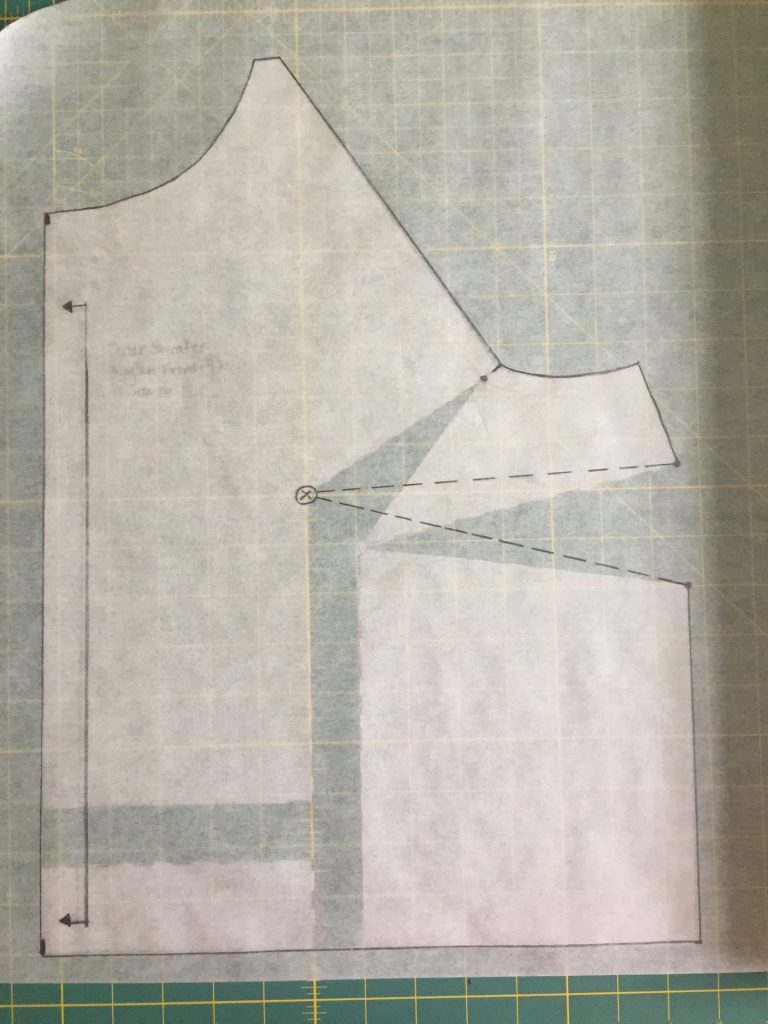
Connect side seam dots to bust point. 
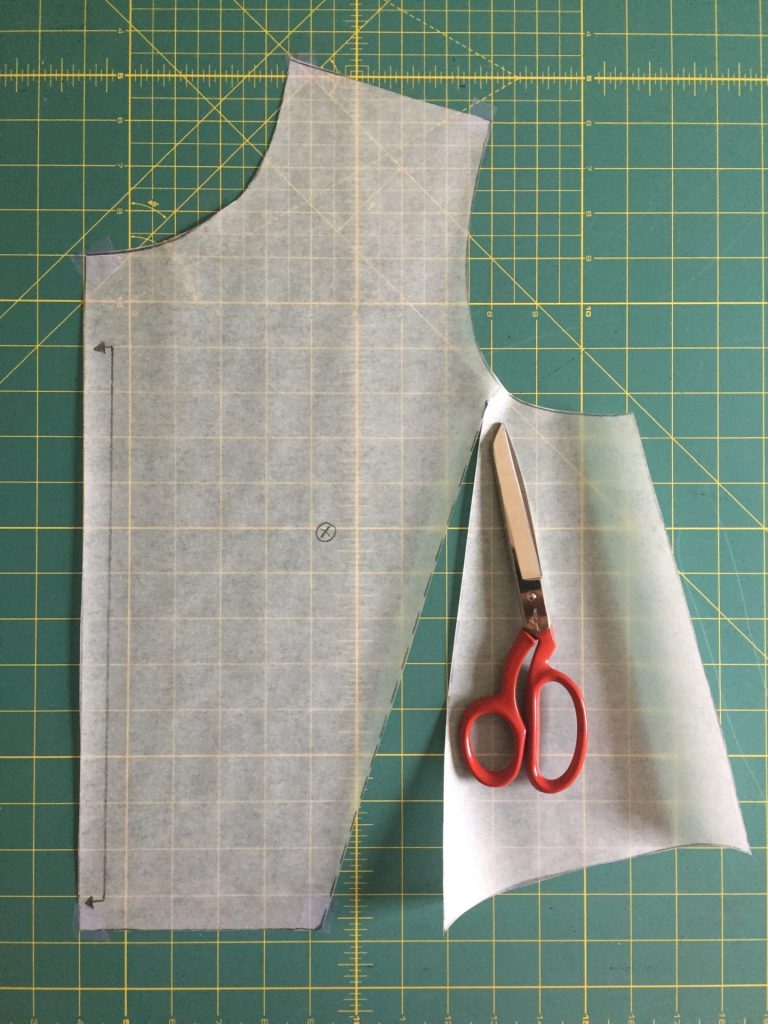
Cut out new dart. 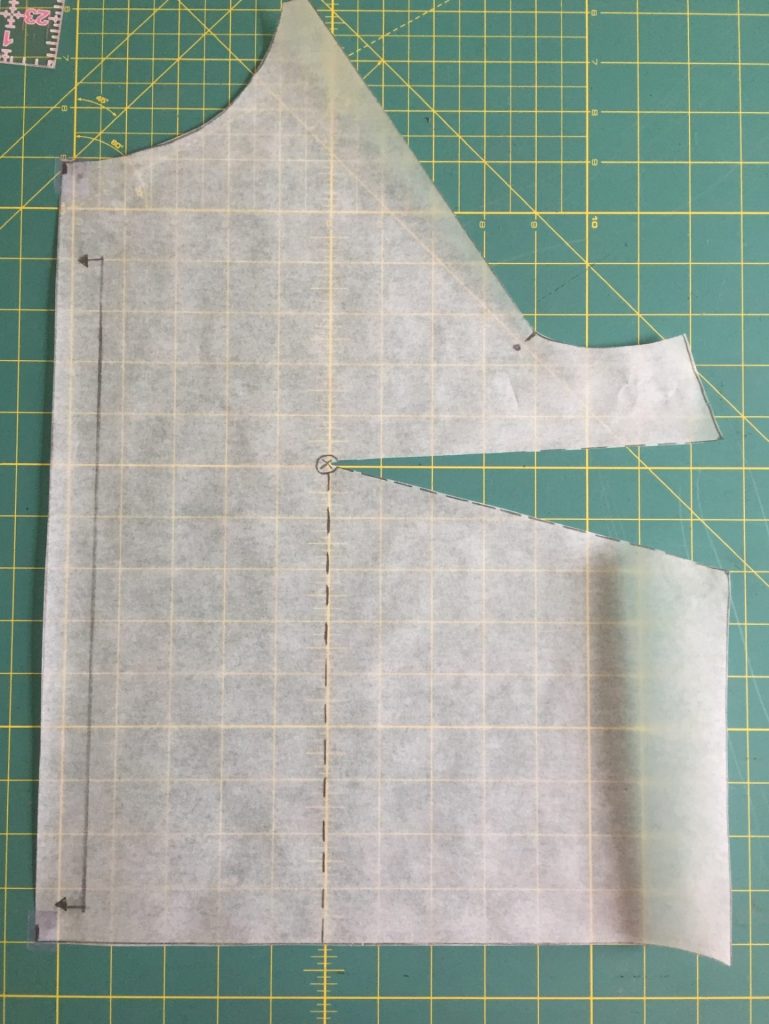
Draw cutting line from bust point (X) straight down to hem 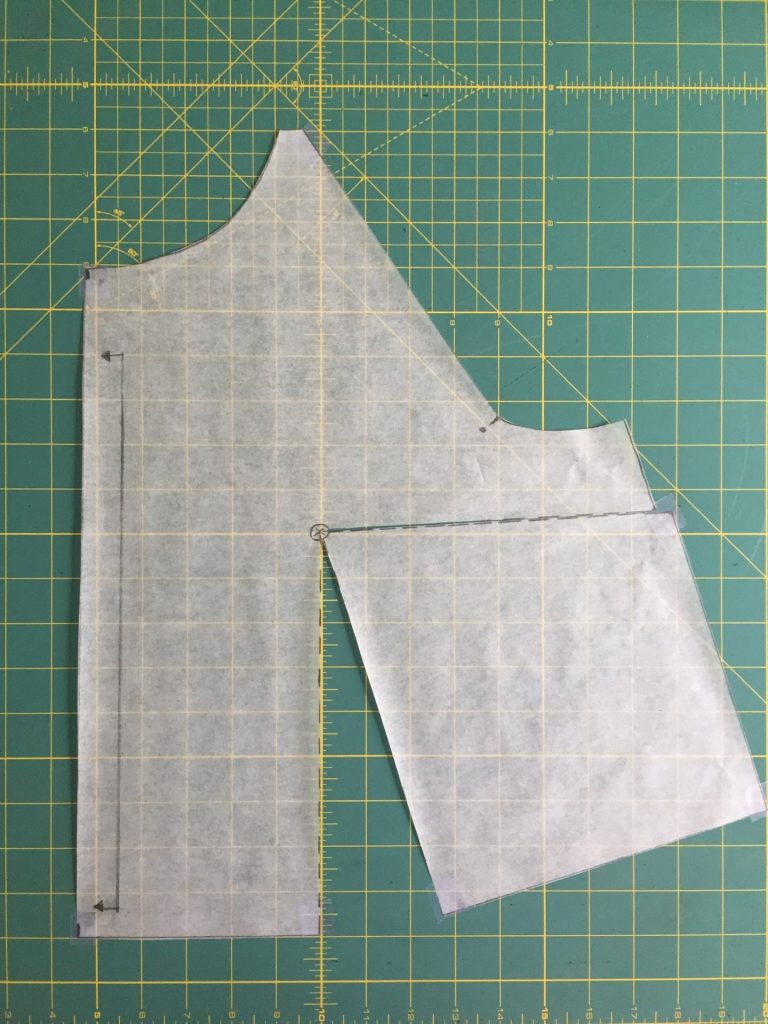
Cut from hem to bust point (X) and pivot piece to close dart. 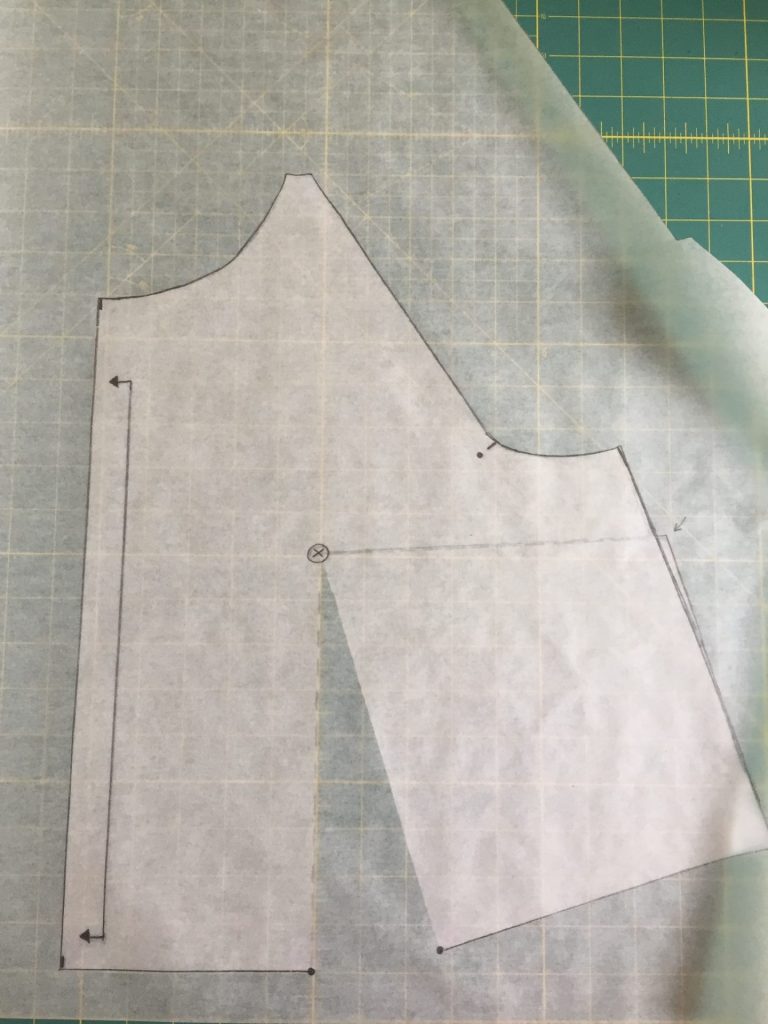
Trace/fill in gap. Mark where the hem line was split with dots. 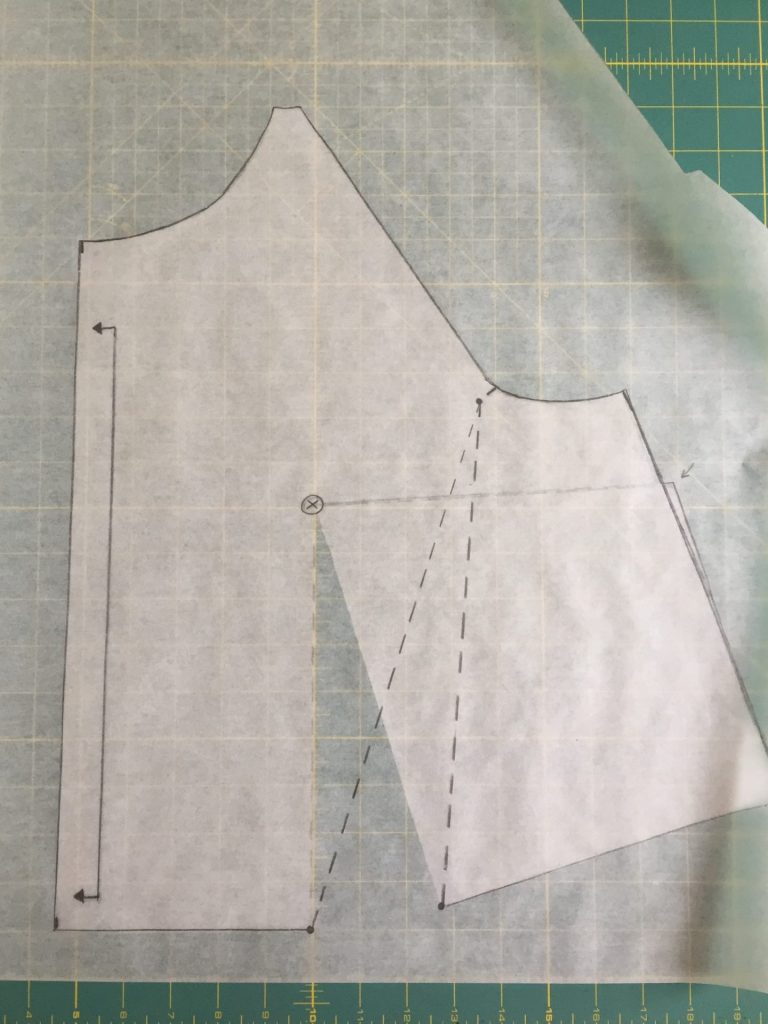
Connect the dots on hem to seam line dot near armscye notch. 
Cut out new waist dart up to seam line dot, not through. 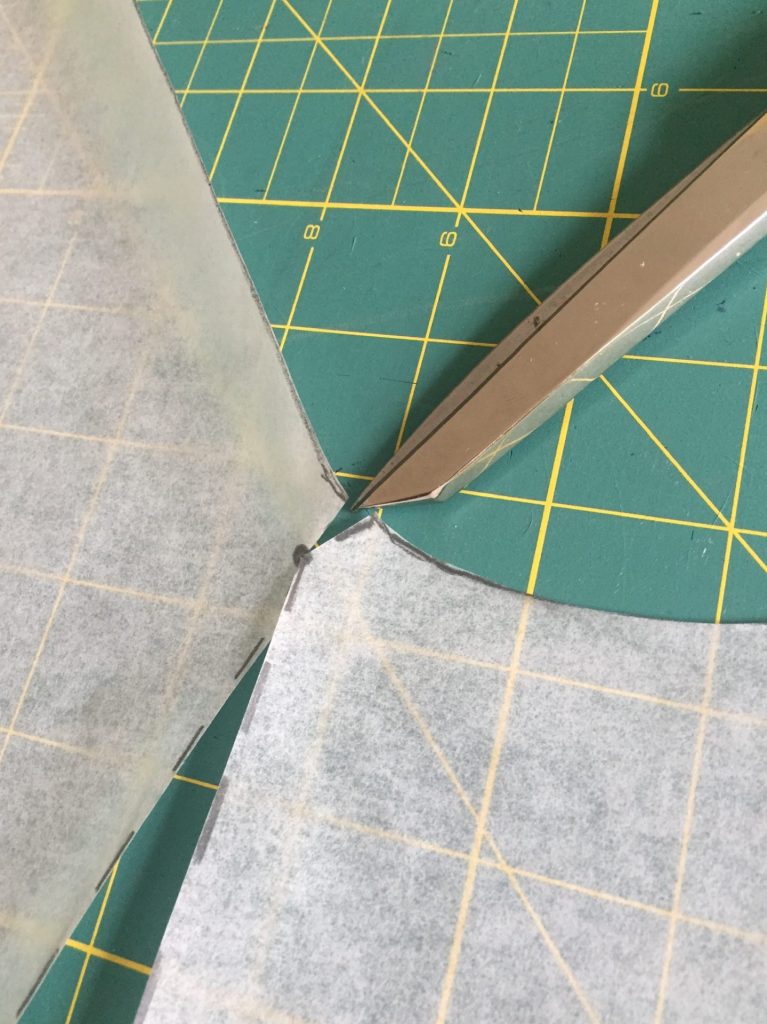
Clip notch up to seam line dot, not through. 
Pivot piece to close waist dart. Tape. 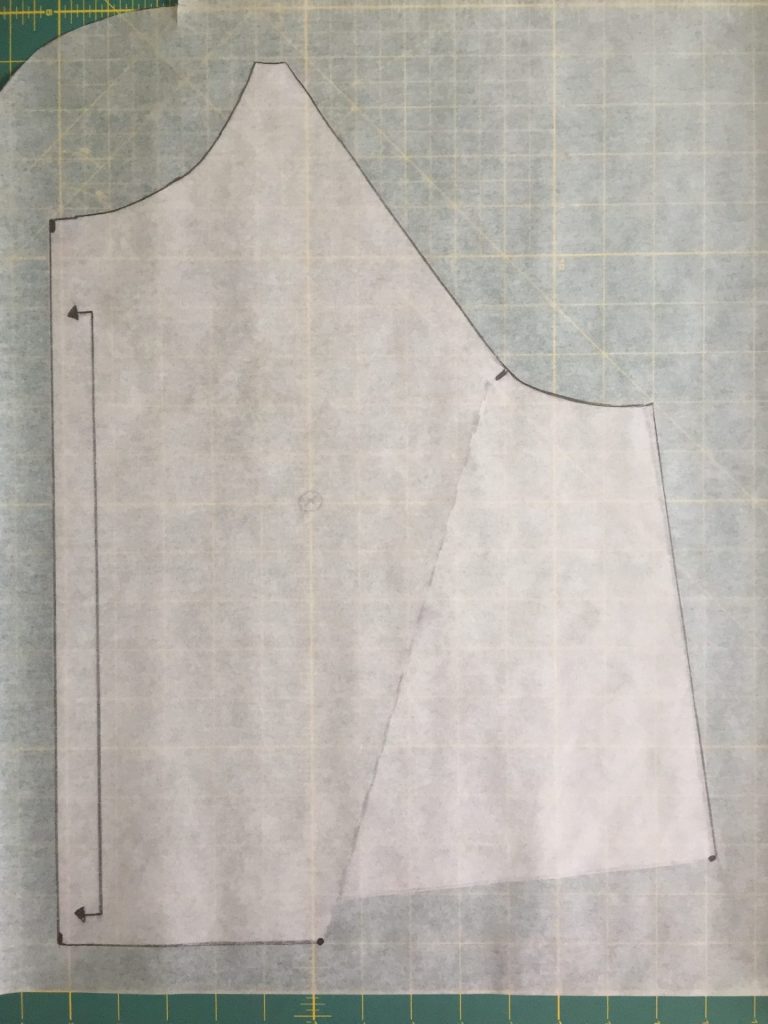
Trace or fill in gap at the hem. Mark end of side seam and lower edge of hem. 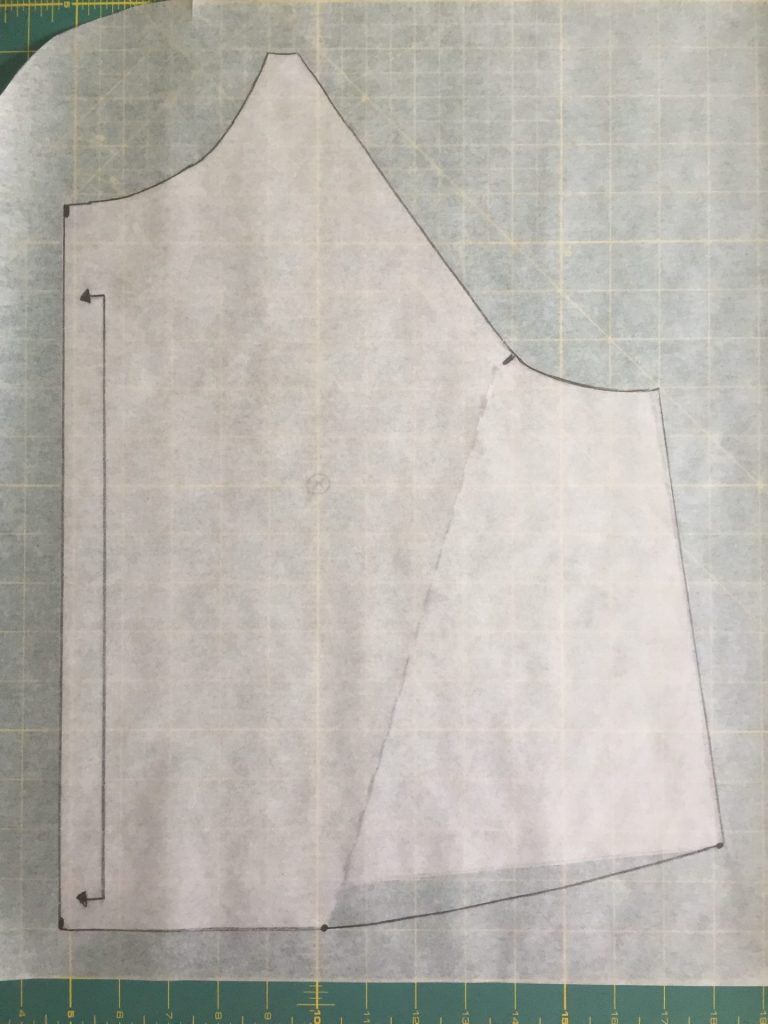
Draw the new hem line with a smooth curve. 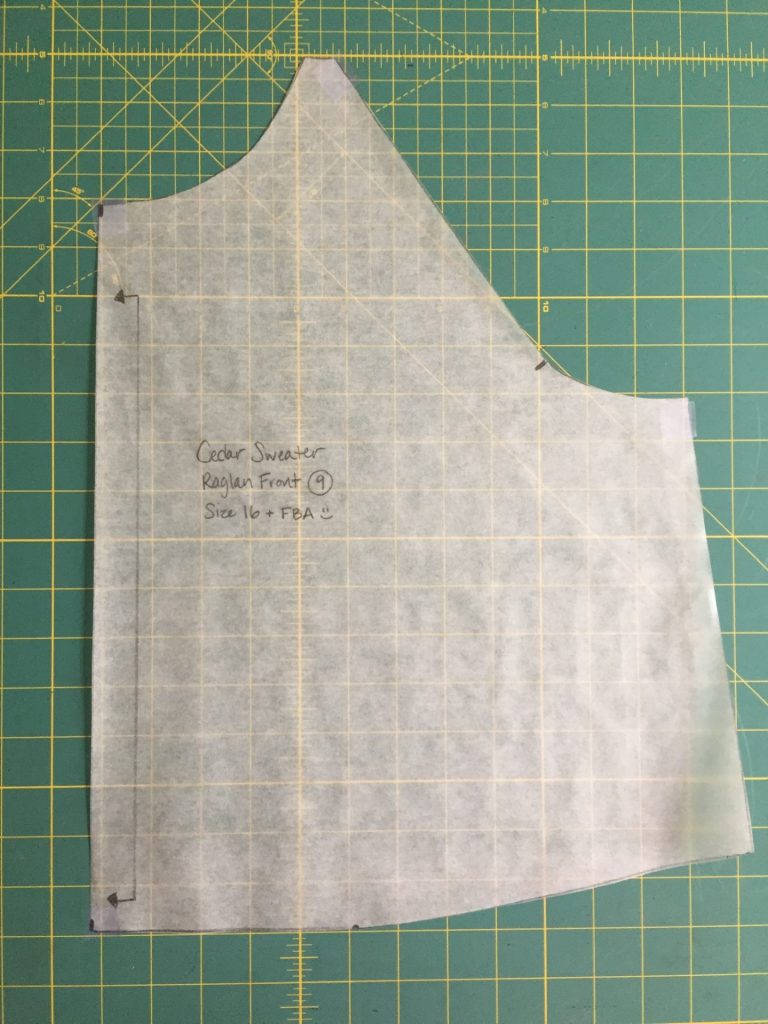
You did it! Be sure to transfer all your notches and markings to your new Cedar Sweater Raglan Front pattern piece with FBA.

Ready to get sewing?
Head on over to the Cedar Sweater Sewalongs!
I’m not sure this FBA method adds any width to the front bodice. I think that when you pivot the side dart to the waist and then to the hem, you essentially bring the width across the bust right back to what it was before. I tried it and I’m scratching my head… Even in the pictures it seems that the widths of the original and the final are the same along the bust. The grid underneath helps to seem the measurement… My FBA using this method added length to the center of the bodice and width below the hip but my bust circumference is the same. Is that what you intended?
Hi! I left a comment yesterday re: this tutorial. I figured out what I did wrong! Just wanted to let you know so that you’re not wasting time trying to answer back. 😬 Thank you!
Sorry for the delayed reply – I just saw your comment! I’m so glad you’ve got it figured out! xo